The FBX format, which is supported by virtually every 3D engine, is a proprietary format for 3D models developed by Autodesk.
It supports:
- Vertices
- Indices
- Normals
- UV coords
- Materials
- Animations
Many other types of information are also supported, but they have little or no use for a game engine.
Two ways are viable to integrate FBX files’ support into an engine:
- Use the official Autodesk’s FBX SDK, which permits to import and export FBX files, or other libraries that serve the same purpose. The SDK exposes two interfaces, one in C++ and the other one in Python.
- Write a custom FBX parser, avoiding the dependence from other libraries.
The first way is straight-forward: just download the SDK and follow the documentation. Beware that the FBX SDK is not so simple to use as one would think.
What I’ll cover in this article is the structure of a FBX file. The understanding of it allows one to write a custom, lightweight parser. For an example of a custom FBX parser you can look up Blender’s FBX importer/exporter plugin.
However, being the format proprietary, a public specification of the format is not available. Still, the FBX SDK contains some headers that partially reveal the layout of the format.
The format can be either in ASCII (text file, readable by humans) or in binary form.
From the first representation is therefore easier to deduce what the structure of the format is, and where is the information (geometry, materials, etc…) that we need.
To begin with, I’ll show how to get the basic geometry information from a FBX ASCII file. If you need help with the actual implementation (which is not covered here), don’t hesitate to ask me and I’ll do my best to help you with pseudocode or even C.
The file structure
This (http://www.ics.uci.edu/~djp3/classes/2014_03_ICS163/tasks/arMarker/Unity/arMarker/Assets/CactusPack/Meshes/Sprites/Rock_Medium_SPR.fbx) is an example FBX file.
The first thing to notice is that there are lines that begin with the semicolon: those are comments and have to be ignored when reading the file.
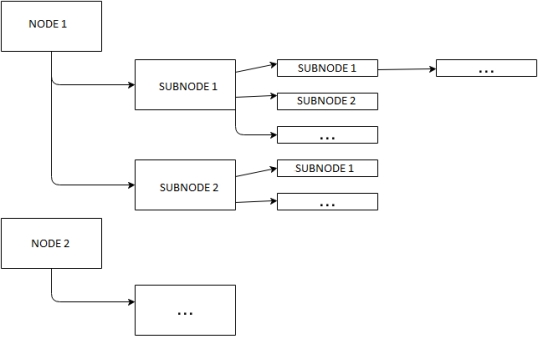
After the initial comments the identifier FBXHeaderExtension is found. This is the first main node of the file structure. The FBX file format is indeed structured as a tree that follows this scheme:
Each node or subnode can have its own specific properties. Properties can also be found outside of main nodes, but can generally be ignored. In general, the following is the base structure of a node:
node name: eventual_properties {  <---- beginning of node
	Node_Property_1: value
	Node_Property_2: value
	Subnode1 :  {   <---- beginning of subnode
		Subnode_Property_1: value
		[…]
	}   <---- end of subnode
	Node_Property_3: value
	[…]
} <---- end of node
Here is a node (the first) found in the example file:
FBXHeaderExtension:  { <---- beginning of node
	FBXHeaderVersion: 1003 <---- node property
	FBXVersion: 6100
	CreationTimeStamp:  { <---- beginning of subnode (1)
		Version: 1000  <---- subnode property
		Year: 2014
		Month: 03
		Day: 20
		Hour: 17
		Minute: 38
		Second: 29
		Millisecond: 0
	} <---- end of subnode (1)
	Creator: "FBX SDK/FBX Plugins build 20070228"
	OtherFlags:  { <---- beginning of subnode (2)
		FlagPLE: 0
	} <---- end of subnode (2)
}
Understanding the structure is fundamental in order to write an efficient parser.
In the first node we find two properties (FBXHeaderVersion e FBXVersion) whose values are the format version. In this case it’s the 6.1 version. The other information can be ignored, unless you want to read also the creation date (CreationTimeStamp).
The objects
The most important node is surely the Objects node.
It contains the vertices of our models, the indices, the normals, the UV coordinates, and the materials. It’s structured like this:
Objects:  { <---- beginning of node Objects
	Model: “model name”, “Mesh” { <---- beginning of node of the model
		[…]
		Vertices: […]		<---- vertices
		PolygonVertexIndex: […]  <---- indices
		LayerElementNormal: { }  <---- node of the normals
		LayerElementUV: { }  <---- node of the UV coords
	} <---- end of node of the model
	Material: “material name”, “” { } <---- node of the material
	[…]
} <---- end of node Objects
The vertices
As we’ve seen, vertices can be found in the Model subnode, in the property called Vertices.
The syntax is the following:
Vertices: v1_x, v1_y, v1_z, v2_x, v2_y, v2_z, […]
Each vertex has three spatial coordinates (x,y,z) separated by a comma (that also separates one vertex from the other). The coordinates are obviously expressed in decimal form, with the dot.
Example:
Vertices: 0.000000,0.104800,39.291698,0.000000,0.043400,-44.424301,0.000000,38.654301,-41.818802,-0.000000,39.455002,44.424400
The vertices that make up the model will be:
v1(0.000000,0.104800,39.291698)
v2(00.000000,0.043400,-44.424301)
v3(0.000000,38.654301,-41.818802)
v4(0.000000,39.455002,44.424400)
The indices
Indices can be found under the PolygonVertexIndex property.
A FBX file can export three-sided polygons (triangles) or more. The majority of files export four-sided polygons (quads). The syntax is similar to that of the vertices, but there is a thing that needs attention:
PolygonVertexIndex: i1, i2,-i3, i4, i5,-i6,[…] <—- triangles syntax
PolygonVertexIndex: i1, i2, i3, -i4, i5, i6, i7, -i8, […] <—- quads syntax
The indices that make up the polygon are in order and a negative index means that it’s the last index of the polygon. That index needs to be made positive and then you have to subtract 1 from it!
[If you’re wondering why, it’s because the original index is XOR’ed with -1. So for example the index 3 becomes -4]
Example:
PolygonVertexIndex: 8,7,3,-7,4,8,7,-3,0,5,8,-5
The polygons that make up the model will be:
p1(8,7,3,6)
p2(4,8,7,2)
p3(0,5,8,4)
Please note that the index that states the end of the polygon has been made positive and then 1 has been subtracted from it.
N.B.: Graphics cards do not like quads, so you will have to divide each polygon with four sides in two triangles.
The normals
The normals can be found under the subnode LayerElementNormal (which is in turn a subnode of Model), in the Normals property. The syntax is the same as the one of the vertices, that is a series of (x,y,z) coordinates.
Normals: n1_x, n1_y, n1_z, n2_x, n2_y, n2_z, […]
You need to pay attention to the MappingInformationType property, that can have the following values:
- ByPolygon
- ByPolygonVertex
- ByVertex (or also ByVertice, as the Blender exporter writes. I think the author is spanish.)
- ByEdge
- AllSame
ByPolygon
It means that there is a normal for every polygon of the model.
ByPolygonVertex
It means that there is a normal for every vertex of every polygon of the model.
For example, if the models has 8 vertices that make up four quads, then there will be 16 normals (one normal * 4 polygons * 4 vertices of the polygon). Note that generally a game engine needs the vertices to have only one normal defined. So, if you find a vertex has more tha one normal, you can either ignore the normals you find after the first, or calculate the mean from all of them (normal smoothing).
ByVertex
It means that there is a normal for every vertex of the model.
ByEdge
It means that there is a normal for every edge of the model (rare).
AllSame
It means that there is a normal that is the same for every vertex of the model (rare or impossible for most models).
Another important property is the ReferenceInformationType one, that can have the following values:
- Direct
- IndexToDirect (or Index for older versions of the FBX format)
Direct
The normals are in order.
IndexToDirect
The order of the normals is given by the NormalsIndex property.
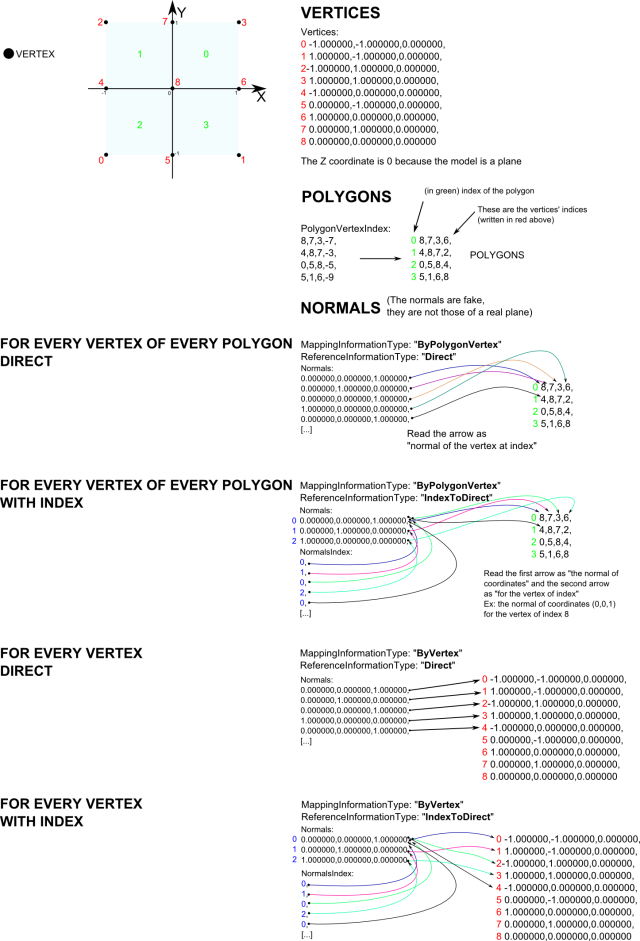
Following is a graphic example that is probably clearer than words. The example model is a plane that lies on the X and Y axes (so the Z coordinate of all the vertices will be 0) that is made up from 9 vertices and 4 polygons (quads). The example drawing is a view of the plane from the top.
The UV coordinates
The UV coordinates can be found under the subnode LayerElementUV (which is in turn a subnode of Model), in the UV property. The syntax is similar to that of the vertices and the normals, but of course there will be two coordinates and not three.
UV: u1, v1, u2, v2, […]
You still have to pay attention to the MappingInformationType and ReferenceInformationType properties! The values that those two properties can have are the same of those of the normals, so the same rules apply. The index property, if there is one (that is if IndexToDirect is defined), is UVIndex.
If you have any questions, feel free to comment here or write me an email at banex19 AT gmail DOT com!


Thanks a lot, it is very helpful. But I want to know in more details about the current version of fbx format. Can you please help me with it.
Hey, unfortunately that’s all the work I have done with this format and I am not up to date with recent changes. Searching on Google can help you though, and I always recommend looking at Blender’s exporter plugin for a reference.
Thanks a lot,but I want to know the details about the Animation,Can you please help me with it.
Thanks alot for the information. Would appreciate if you could explain how to import materials from FBX models.
Thanks a lot!
What is UV in this format?
Unfortunately I don’t work with FBX files anymore. You can have a look at https://code.blender.org/2013/08/fbx-binary-file-format-specification/ and https://wiki.blender.org/index.php/User:Mont29/Foundation/FBX_File_Structure . There are also many open-source FBX readers/writers if you do a Google search.
UV is the texture coordinates, bound to a point of a triangle: 0, 0 means the point has the top left point of a texture bound to it. 1, 1 means the point has the bottom right point of a texture bound to it. The rest of the texture on the triangle is linearly interpolated.
Thanks a lot, Really save me from autodesk official doc
Thank you very much! Awesome reference guide.